Bleed Explained
Bleed Explained
If you are uploading your own file for us to print or if you want an explanation of "bleed" please read the following.
This example will use a business card but the concept applies to all printed material.
A standard size for a printed business card is 3.5" wide by 2" high.
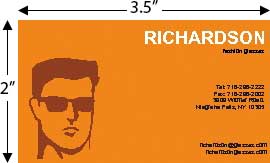
If you upload a file that has these dimensions the hope and expectation is that your finished card will look just like the one you uploaded.
The Problem
In reality what you get may be just a little bit different and there are a couple of reasons for this. All printing companies have the same problem printing a file that has no bleed.
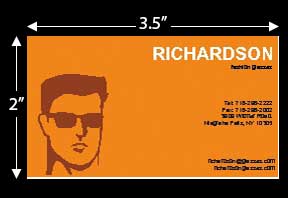
The finished product from a file with no bleed (a provided file that the dimensions are the same as the finished product) will usually have a thin strip of white on one or more of the edges, and it may not always be the same edge or edges. (It will be white because the paper is white)
This is because the paper shifts a little when being printed, or it may shift a little when being cut, or it may shift at both times.
The example below shows a white edge on the bottom and right side to simulate what a finished card could look like if the file is submitted with no bleed and printed without us making any adjustments to it.
When we get your file we go through the following steps that affect the finished product (there are other steps but the ones below have the most impact on how your file prints)
1. Impose the image (create a file that has multiple copies of the image on one sheet, this helps reduce cost)
2. print the file
3. cut the individual images out of the paper(Because there are multiple images on one sheet of paper the cutter cuts out multiple images at the same time. With business cards there are 24 images on a sheet. 4 rows with 6 cards in each row. Multiple sheets of the same order are stacked when cut to help reduce time and labor and ultimately cost.)
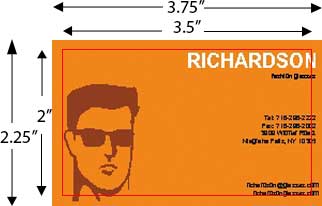
To try and solve this the printing company will usually enlarge the image to provide bleed so there is no white strip when cut. Enlarging the image may create other problems like cutting of some important information or cut into a picture or graphic.
In the example below the image was uploaded as a 3.5" x 2" image and then enlarged to 3.75" x 2.25" to provide proper bleed. You can tell that some of the wording will be cut off as well as part of the graphic. It may even cut off part of the ear depending on if the paper shifts a little when cut. (It will be cut on the red line)
The Solution
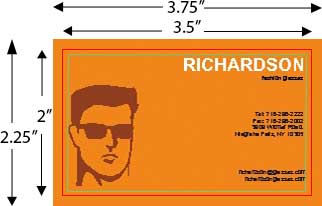
The easiest solution is to provide a file that has bleed. The industry standard is .125" around all four edges.
For a business card that means the file uploaded should measure 3.75" x 2.25", and then when printed and cut to size it will measure 3.5" x 2"
When creating a file with bleed make sure the elements of the image stay within a safe margin from the edge so they don't get trimmed and still look good. Typically the safe margin is .125" from the cut mark.
In the example below the image on the provided file measures 3.75" x 2.25". The illustration shows the red line where the image will be cut. The red line is .125" from the edge on all four sides. This gives a finished size of 3.5" x 2". The safe margin (green line) is .125" inside of the cut mark or a total of .25" from the edge of the image. This ensures everthing important on the file is printed and not cut off.
By following these steps your order can be printed and the end result will look the way you want it to without anything being cut off. Remember that this principle applies to business cards, announcements, inserts etc. just about everthing we print.